How do Install Handrails in Bathtubs and Shower Rooms?
The integral bathtub and shower room are composed of a glass fiber shell coated with gel. The grab mounting bracket is specially manufactured for fiberglass installation. Its valve flap can safely disperse people's weight and prevent fiberglass from cracking. By bolting the bracket to the wall stud, ensure that the handrail does not pull out of the bathtub or shower wall during use. Handrails for shower rooms can be purchased in two sets, and you can install a vertical handrail in an integral bathtub and shower to help you stand; Install a horizontal armrest in the bathtub to help people stand up or sit down. Follow the steps below to complete the installation.
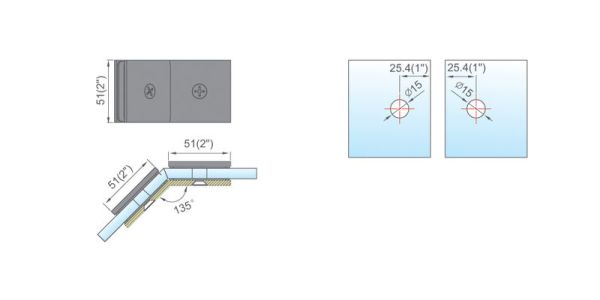
Step 1 - Use a stud locator to locate a stud on the shower wall near the shower head. Locate the center of the column 83.82 centimeters from the ground and mark it with low-nailed painter's tape. This is where the vertical grab is installed. Find an adjacent column on the wall. Place a low-viscosity painter's tape on the wall, with both ends of the tape aligned with the centers of the two adjacent studs, so that when you sit in the bathtub, you can easily find the armrest.
Step 2 - Push the first grab bar onto the vertical adhesive tape. Place the mounting flange of the armrest on the centerline of the stud. Mark the position of the mounting flanges along their circumference. Do the same for the second handrail and the cross strap placed between the two studs. Find the center of the traced circle and mark it with a dot. Drill a 0.33 cm hole in the point. Insert a nail into each hole to confirm that it is above the stud. Use a 5.08 cm hole saw to cut a 5.08 cm hole in the fiberglass shower wall.
Step 3 - Measure the length of the space between the studs and the top surface of the shower wall. Using a multipurpose knife, cut the padded armrest to this length. Drill a 0.48 cm guide hole in each stud. Place the guide hole on the stud and place the 5.08 cm hole on the shower wall. Insert the tension bolt and washer into the mounting pad. Insert the mounting gasket tension bolt assembly into the guide hole. Use a socket wrench to insert the bolt into the stud until the handle is tightened.
Step 4 - Place a circle of silicon caulking around each hole in the shower wall. Place the mounting bracket and the valve disc side facing your bracket on the mounting gasket. Fasten the mounting bracket to the threaded shaft of the spacer until the back of the mounting bracket disc contacts the shower wall. Align the screw holes in the armrest mounting flange with the holes in the mounting bracket. Use a screwdriver to thread the screw through the hole until you manually secure the armrest to the shower wall. Connect the other armrest in the same way.